Say you are learning to code for the first time, in Python, for example, which is a great starting point for getting into development. You are likely to come across some information like “a variable stores a value.” That sounds straightforward, but if you are a beginner just starting, then it can also be a bit confusing. How does a variable store or hold something? What happens when we assign a new value to it?
To figure things out, you could read a bunch and watch tutorials, but sometimes, resources like these don’t help the concept fully click. That’s where animation helps. It has the power to take complex programming concepts and turn them into something visual, dynamic, and easy to grasp.
Let’s break it down with an example: Say we have a box labeled X, first empty, then fill with a value 5, for this example, then update to 12, then 8, then 20, then 3.
Even if you are unfamiliar with Python, an animation like this makes the concept more obvious, helping you understand how variables work with visual cues. You can now visualize the variables as containers that hold and update values dynamically. It’s way easier to see that than it is to just read about variables.
Well, Manim isn’t just limited to programming; it works for math, physics, UI/UX, and more. In trigonometry, you can take something like a “Sine Wave” as an example, which is a smooth, continuous curve that moves up and down in a repeating pattern, and it is found everywhere from sound waves to electrical signals to the motion of a pendulum.
Sounds simple, right? Or maybe a bit confusing, especially if you’re not a math person, but let me help with this:
Now, with this, you can see how the wave moves. Instead of just numbers and formulas, you’re watching it happen. And that’s pretty much the idea here! In this article, we’ll explore Manim and how it makes concepts easier to understand through animation.

Manim, Manim! What Is It?
Contents
By now, you may have a rough idea of what Manim can do, but let’s break it down a little more. What exactly is Manim? Well, it’s two things.
First, Manim is an open-source Python library for creating high-quality mathematical animations.
If you’ve ever watched a 3Blue1Brown video, you’ve seen Manim in action because Grant Sanderson originally developed it for his YouTube channel.
Second, Manim is a script-driven animation engine, meaning you write Python code to generate animations instead of dragging and dropping elements like in typical video editing software.
This gives you precise control over every detail, including text, color, shape, transformations, timing — you name it. Whether you’re explaining math, physics, or programming concepts, Manim makes it fairly easy to create clear and dynamic visuals with just a few lines of code. Plus, it works seamlessly with LaTeX, so you can render mathematical equations beautifully without extra effort. That’s why it’s popular among educators, researchers, and content creators.
Of course, Manim isn’t the only tool you can use. If it doesn’t quite fit your needs or the programming language you are most comfortable with, here are some alternatives worth checking out:
- Processing
This is a Java-based coding framework, great for generative art and interactive visuals. If you enjoy experimenting with visual design through code, in Java, to be exact, then Processing gives you a solid foundation. - p5.js
This is a JavaScript library, an alternative for web animations. If you’re a front-end developer working with HTML and CSS, p5.js makes it easy for you to create graphics directly in the browser. - Desmos
This focuses on math visualization. Desmos lets you create interactive graphs and scripted animations directly in the browser. You can use it through Desmos Graphs, Desmos Calculator, or the Desmos API. - Blender (with Python Scripting)
This is mostly known for 3D animation, but with its Python API, you can script animations, including math and physics-based simulations.
Now, let’s compare them:
| Tool | Language | Best For | Strengths |
|---|---|---|---|
| Manim | Python | Math, physics, programming animations | High precision, script-driven, LaTeX support |
| Processing | Java | Generative art, interactive visuals | Great for creative coding |
| p5.js | JavaScript | Web-based animations | Works well with HTML & CSS |
| Blender (Python API) | Python | 3D & math-based animations | Powerful 3D capabilities, physics simulations |
| Desmos | JavaScript | Math visualizations | Browser-based, great for interactive graphs |
How To Get Started
There are multiple ways to install the library. You can set it up locally, use Conda or Docker, or run it inside Jupyter Notebooks. But if you don’t want to deal with installations, Replit is a great alternative, as it’s a real-time live editor that lets you start coding animations instantly.
1. Create An Account On Replit Using GitHub or Email.
Once you’re in, your dashboard should look something like this:
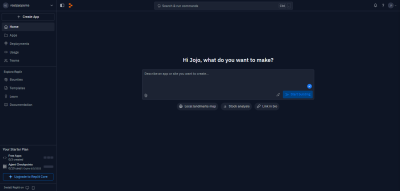
2. Click “Create App”
You’ll see three options:
- “Create With Replit Agent”,
- “Choose a Template”,
- “Import from GitHub”.
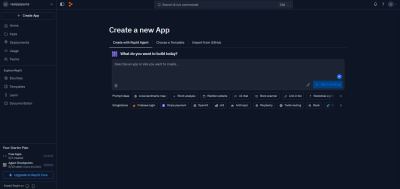
3. Select “Choose a Template”
Then, search for Manim and create your app. At this point, you don’t have to do anything else because this sets up everything for you (including the main.py file, a media folder, and all of the required dependencies).

Voilà! Now you can start coding your animations right away!
Using Manim For Math, Code, And UI/UX Visuals
Okay, you know Manim. Whether it’s for math, programming, physics, or even prototyping UI concepts, it’s all about making complex concepts easier to grasp through animation. But how does that work in practice? Let’s go through some ways Manim makes things clearer and more engaging.
1. Math & Geometry Visuals
Sometimes, math can feel a bit like a puzzle with missing pieces. But with Manim, numbers, shapes, and graphs move, making patterns and relationships easier to grasp. Take graphs, for example. When you tweak a parameter, Manim instantly updates the visualization so you can watch how a function changes over time. And that’s a game-changer for understanding concepts like derivatives or transformations.

Geometry concepts also come easier and become even more fun when you can see those shapes move, giving you a clear understanding of rotation or reflection. If you’re drawing a triangle with a compass and straightedge, for example, Manim can animate each step, making it easier to follow along and understand the idea.

2. Coding & Algorithms
As you may already know, coding is a process that runs step by step, and Manim makes that easy to see. Whether you are working on the front end or the back end, logic flows in a way that’s not always clear from just reading or writing code. With Manim, you can, for example, watch how a sorting algorithm moves numbers around or simply how a loop runs.
The same goes for data structures like linked lists, trees, and more. A binary tree makes more sense when you can see it grow and balance itself. Even complex algorithms like Dijkstra’s shortest path become clearer when you watch the path being calculated in real time, even if you may not have a background in math.
3. UI/UX Concepts & Motion Design
Although Manim is not a UI/UX design tool, it can be useful for demonstrating designs. Static images can’t always show the full picture, but with Manim, before-and-after comparisons become more dynamic, and of course, it makes it easier to highlight why a new navigation menu, for example, is more intuitive or how a checkout flow reduces friction.
Animated heatmaps can show click patterns over time, helping to spot trends more easily. Conversion funnels become clearer when each stage is animated, revealing exactly where users drop off.
Let’s Manim!
Well, that’s a lot we covered! By now, you should have Manim installed in whatever way works best for you. But before we jump into the coding part, let’s quickly go over Manim’s core building blocks. Manim’s animations are made of three main concepts:
- Mobjects,
- Animations,
- Scenes.
1. Mobjects (Mathematical Objects)
Everything you display in Manim is a Mobject (short for “mathematical object”). There are different types:
- Basic shapes like
Circle(),Rectangle(), andArrow(), - Text elements for adding labels, and
- Advanced structures like graphs, axes, and bar charts.
A mobject is more like a blueprint, and it won’t show up unless you add it to a scene. Here’s a brief example:
from manim import *

class MobjectExample(Scene):
  def construct(self):
    circle = Circle()  # Create a circle
    circle.set_fill(BLUE, opacity=0.5)  # Set color and transparency
    self.add(circle)  # Add to the scene
    self.wait(2)
A blue circle will appear for about two seconds when you run this:
2. Animations
Animations in Manim, on the other hand, are all about changing these objects over time. Rather than just displaying a sharp edge, we can make it move, rotate, fade, or transform into something else. Really, we do have this much control through the Animation class.
If we use the same circle example from earlier, we can add animations to see how it works and compare the visual differences:
from manim import *

class AnimationExample(Scene):
  def construct(self):
    circle = Circle()
    circle.set_fill(BLUE, opacity=0.5)

    self.play(FadeIn(circle))
    self.play(circle.animate.shift(RIGHT * 2))
    self.play(circle.animate.scale(1.5))
    self.play(Rotate(circle, angle=PI/4))
    self.wait(2)
Here, we are making a move, scaling up, and rotating. The play() method is what makes animations run. For example, FadeIn(circle) makes the circle gradually appear, and circle.animate.shift(RIGHT * 2) moves it two units to the right. If you want to slow things down, you can add run_time to control the duration, like the following:
self.play(circle.animate.scale(2), run_time=3),
This makes the scaling take three more seconds instead of the default amount of time:
3. Scenes
Scenes are what hold everything together. A scene defines what appears, how it animates, and in what order. Every Manim script has a class that is inherited from a Scene, and it contains a construct() method. This is where we write our animation logic. For example,
class SimpleScene(Scene):
  def construct(self):
    text = Text("Hello, Manim!")
    self.play(Write(text))
    self.wait(2)
This creates a simple text animation where the words appear as if being written.
Bringing Manim To Design
As we discussed earlier, Manim is a great tool for UI/UX designers and front-end developers to visualize user interactions or to explain UI concepts. Think about how users navigate through a website or an app: they click buttons, move between pages, and interact with elements. With Manim, we can animate these interactions and see them play out step by step.
With this in mind, let’s create a simple flow where a user clicks a button, leading to a new page:
from manim import *

class UIInteraction(Scene):
  def construct(self):
    # Create a homepage screen
    homepage = Rectangle(width=6, height=3, color=BLUE)
    homepage_label = Text("Home Page").scale(0.8)
    homepage_group = VGroup(homepage, homepage_label)

    # Create a button
    button = RoundedRectangle(width=1.5, height=0.6, color=RED).shift(DOWN * 1)
    button_label = Text("Click Me").scale(0.5).move_to(button)
    button_group = VGroup(button, button_label)

    # Add homepage and button
    self.add(homepage_group, button_group)

    # Simulating a button click
    self.play(button.animate.set_fill(RED, opacity=0.5))  # Button press effect
    self.wait(0.5)  # Pause to simulate user interaction

    # Create a new page (simulating navigation)
    new_page = Rectangle(width=6, height=3, color=GREEN)
    new_page_label = Text("New Page").scale(0.8)
    new_page_group = VGroup(new_page, new_page_label)

    # Animate transition to new page
    self.play(FadeOut(homepage_group, shift=UP),  # Move old page up
      FadeOut(button_group, shift=UP),  # Move button up
      FadeIn(new_page_group, shift=DOWN))  # Bring new page from top
    self.wait(2)
The code creates a simple UI animation for a homepage displaying a button. When the button is clicked, it fades slightly to simulate pressing, and then the homepage and button fade out while a new page fades in, creating a transition effect.
If you think of it, scrolling is one of the most natural interactions in modern web and app design. Whether moving between sections on a landing page or smoothly revealing content, well-designed scroll animations make the experience feel fluid. Let me show you:
from manim import *

class ScrollEffect(Scene):
  def construct(self):
    # Create three sections to simulate a webpage
    section1 = Rectangle(width=6, height=3, color=BLUE).shift(UP*3)
    section2 = Rectangle(width=6, height=3, color=GREEN)
    section3 = Rectangle(width=6, height=3, color=RED).shift(DOWN*3)

    # Add text to each section
    text1 = Text("Welcome", font_size=32).move_to(section1)
    text2 = Text("About Us", font_size=32).move_to(section2)
    text3 = Text("Contact", font_size=32).move_to(section3)

    self.add(section1, section2, section3, text1, text2, text3)
    self.wait(1)

    # Simulate scrolling down
    self.play(
      section1.animate.shift(DOWN*6),
      section2.animate.shift(DOWN*6),
      section3.animate.shift(DOWN*6),
      text1.animate.shift(DOWN*6),
      text2.animate.shift(DOWN*6),
      text3.animate.shift(DOWN*6),
      run_time=3
    )
    self.wait(1)
This animation shows a scrolling effect by moving sections of a webpage upward, simulating how content shifts as a user scrolls. It is a simple way to visualize transitions that make the UI feel smooth and engaging.
Wrapping Up
Manim makes it easier to show how users interact with a design. You can animate navigations, interactions, and user behaviors to understand better how design works in action. Is there more to explore? Definitely! You can take these simple examples and build on them by adding more complex features.
But what I hope you take away from all of this is that subtle animations can help communicate and clarify concepts and that Manim is a library for making those sorts of animations. Traditionally, it’s used to help explain mathematical and scientific concepts, but you can see just how useful it can be to working in front-end development, particularly when it comes to highlighting and visualizing UI changes.
(gg, yk)