So, I love drawing birds with code. Inspired by my brother’s love for birdwatching, I admire the uniqueness of their feathers, colors, and sounds. But what I notice most is the way their bodies curve and different birds can have dramatically different curves! So, I took my love for drawing with SVG graphics and used it to experiment with bird shapes. Over time, I’ve drawn enough to become incredibly adept at working with arc shapes.
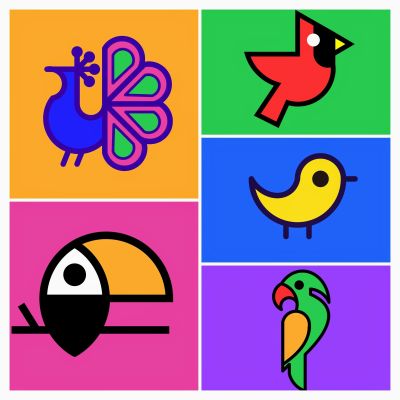
Here are a few of my recent works. Inspired by designs I came across on Dribbble, I created my versions with code. You can browse through the code for each on my CodePen.
But before we dive into creating curves with arcs, please pause here and check out Myriam Frisano’s recent article, “SVG Coding Examples: Useful Recipes For Writing Vectors By Hand.” It’s an excellent primer to the SVG syntax and it will give you solid context heading into the concepts we’re covering here when it comes to mastering SVG arcs.
A Quick SVG Refresher
Contents
You probably know that SVGs are crisp, infinitely scalable illustrations without pixelated degradation — vectors for the win! What you might not know is that few developers write SVG code. Why? Well, the syntax looks complicated and unfamiliar compared to, say, HTML. But trust me, once you break it down, it’s not only possible to hand-code SVG but also quite a bit of fun.
Let’s make sure you’re up to speed on the SVG viewBox because it’s a key concept when it comes to the scalable part of *SVG. We’ll use the analogy of a camera, lens, and canvas to explain this concept. Think of your browser window as a camera and the SVG viewBox as the camera lens focusing on the painting of a bird you’ve created (the SVG). Imagine the painting on a large canvas that may stretch far beyond what the camera captures. The viewBox defines which part of this canvas is visible through the camera.
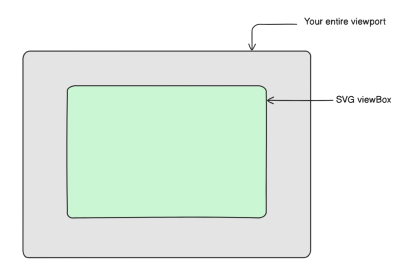
Let’s say we have an SVG element that we’re sizing at 600px square with width and height attributes directly on the <svg> element.
<svg width="600px" height="600px">
Let’s turn our attention to the viewBox attribute:
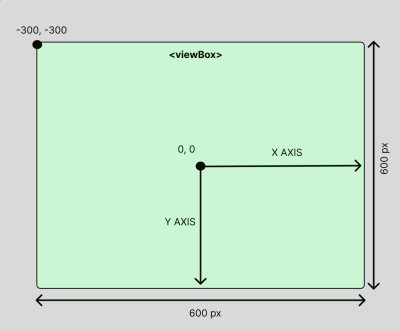
<svg width="600px" height="600px" viewBox="-300 -300 600 600">
The viewBox attribute defines the internal coordinate system for the SVG, with four values mapping to the SVG’s x, y, width, and height in that order.
Here’s how this relates to our analogy:
- Camera Position and Size
The-300, -300represents the camera lens’ left and top edge position. Meanwhile,600 x 600is like the camera’s frame size, showing a specific portion of that space. - Unchanging Canvas Size
Changing thexandyvalues adjusts where the camera points, andwidthandheightgovern how much of the canvas it frames. It doesn’t resize the actual canvas (the SVG element itself, which remains at600×600pixels). No matter where the camera is positioned or zoomed, the canvas itself remains fixed.
So, when you adjust the viewBox coordinates, you’re simply choosing a new area of the canvas to focus on without resizing the canvas itself. This lets you control the visible area without changing the SVG’s actual display dimensions.
You now have the context you need to learn how to work with <path> elements in SVG, which is where we start working with arcs!
The <path> Element
We have an <svg> element. And we’re viewing the element’s contents through the “lens” of a viewBox.
A <path> allows us to draw shapes. We have other elements for drawing shapes — namely <circle>, <line>, and <polygon> — but imagine being restricted to strict geometrical shapes as an artist. That’s where the custom <path> element comes in. It’s used to draw complex shapes that cannot be created with the basic ones. Think of <path> as a flexible container that lets you mix and match different drawing commands.
With a single <path>, you can combine multiple drawing commands into one smooth, elegant design. Today, we’re focusing on a super specific path command: arcs. In other words, what we’re doing is drawing arc shapes with <path>.
Here’s a quick, no-frills example that places a <path> inside the <svg> example we looked at earlier:
<svg width="600px" height="600px" viewBox="-300 -300 600 600"><path d="M 0 0 A 100 100 0 1 1 200 0"fill="transparent" stroke="black" stroke-width="24" /> </svg>
See the Pen [Arc path animation [forked]](https://codepen.io/smashingmag/pen/bNbeQQy) by akshaygpt.
Now, I get it. Looking at that string of numbers for the first time is like staring into the Matrix, right? But once you get the hang of it, you’ll see that arcs aren’t as scary as they look.
Let’s break down the <path> in that example. We’ll break it down even further in the next section, but for now:
M 0 0moves the path to the center of theviewBoxbut doesn’t actually “draw” anything just yet.A 100 100 0 1 1 200 0draws an arc with a radius of100in both the X and Y axes, ending at(200, 0).
You can visualize the coordinate positions in red resulting from different M commands in the following demo:
See the Pen [Arc Possibilities b/w 2 points [forked]](https://codepen.io/smashingmag/pen/EaYyOGW) by akshaygpt.
See that? We have two points along the X-axis that are relative to the viewBox’s center, and a curved line connects them. Now, know that the numbers in an M command are setting coordinates, and the numbers in an A command draw a line along the SVG’s axes. You just drew a curve in SVG!
Dissecting An Arc
We can zoom into the M and A commands even further to better understand what’s happening.
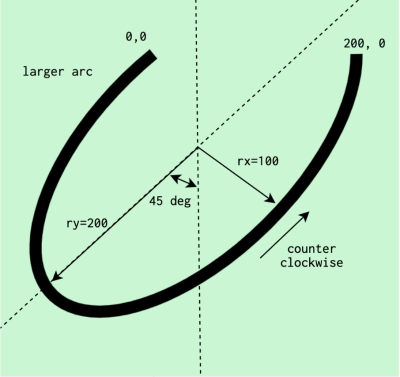
<path d="M 0 0 A 100 100 0 1 1 200 0" />
First off, we’re working with an arc, or more accurately, an elliptical arc, which is a curved line. We know that a perfect circle is merely an ellipse with equal radii in both the X and Y directions. We can change the shape of the circle by giving it different, unmatching radii values.
This is what we know so far:
M0: Coordinate along the X-axis.0: Coordinate along the Y-axis.
A100: Radius value in the X direction.100: Radius value in the Y direction.200: The arc’s endpoint in the X-direction.0: The arc’s endpoint in the Y-direction.
There are three values in the A command that we sort of skipped. These are like “switches” in the sense that they are Boolean values that enable or disable certain things about the arc.
0: Rotates the arc along the X-axis.1: Determines whether this is a “small” arc (0) with a span greater than 180° or a “large” arc (1) with a span greater than 180°.1: Sets whether the arc “sweeps” in a clockwise direction or a counter-clockwise direction, where0equals clockwise and1equals counter-clockwise.
If we take this information and re-write the <path> with these definitions, then it starts to come together more clearly:
<path d="
  M <x-coordinate> <y-coordinate>
  A <radius-x> <radius-y> <rotation-x> <large-arc-flag> <sweep-flag> <endpoint-x> <endpoint-y>
" />
Maybe we can simplify that a bit using abbreviations:
<path d="
  M <x> <y>
  A <rx> <ry> <rotation> <arc> <sweep> <ex> <ey>
" />
Let’s take this information and start playing with values to see how it behaves.
Visualizing The Possibilities
Again, if this is the <path> we’re starting with:
<path d="M 0 0 A 100 100 0 1 1 200 0"/>
Then, we can manipulate it in myriad ways. Mathematically speaking, you can create an infinite number of arcs between any two points by adjusting the parameters. Here are a few variations of an arc that we get when all we do is change the arc’s endpoints in the X (<ex>) and Y (<ey>) directions.
See the Pen [Arc Possibilities b/w 2 points [forked]](https://codepen.io/smashingmag/pen/WbexYLV) by akshaygpt.
Or, let’s control the arc’s width and height by updating its radius in the X direction (<rx>) and the Y direction (<ry>). If we play around with the <rx> value, we can manipulate the arc’s height:
See the Pen [Rx [forked]](https://codepen.io/smashingmag/pen/xbKOQMr) by akshaygpt.
Similarly, we can manipulate the arc’s width by updating the <ry> value:
See the Pen [Ry [forked]](https://codepen.io/smashingmag/pen/mybEQvG) by akshaygpt.
Let’s see what happens when we rotate the arc along its X-axis (<rotation>). This parameter rotates the arc’s ellipse around its center. It won’t affect circles, but it’s a game-changer for ellipses.
See the Pen [x-axis-rotation [forked]](https://codepen.io/smashingmag/pen/VYZjVRx) by akshaygpt.
Even with a fixed set of endpoints and radii (<rx> and <ry>), and a given angle of rotation, four distinct arcs can connect them. That’s because we have the <arc> flag value that can be one of two values, as well as the <sweep> flag that is also one of two values. Two boolean values, each with two arguments, give us four distinct possibilities.
See the Pen [4 cases [forked]](https://codepen.io/smashingmag/pen/wBwWQOb) by akshaygpt.
And lastly, adjusting the arc’s endpoint along the X (<ex>) and Y (<ey>) directions shifts the arc’s location without changing the overall shape.
See the Pen [endx, endy [forked]](https://codepen.io/smashingmag/pen/xbKOQeL) by akshaygpt.
Wrapping Up
And there you have it, SVG arcs demystified! Whether you’re manipulating radii, rotation, or arc direction, you now have all the tools to master these beautiful curves. With practice, arcs will become just another part of your SVG toolkit, one that gives you the power to create more dynamic, intricate designs with confidence.
So keep playing, keep experimenting, and soon you’ll be bending arcs like a pro — making your SVGs not just functional but beautifully artistic. If you enjoyed this dive into arcs, drop a like or share it with your friends. Let’s keep pushing the boundaries of what SVG can do!
(gg, yk)
